I am going to cover the steps to configure and create the ASM disk group on Two node RAC cluster environment.
Storage team will attach the raw disk on the node and handover to UNIX SA and SA will format, scan and label the disk, then handover to DBA team. DBA will create the diskgroup on the ASM instance. I am using Two node RAC and node names are RACTEST1 & RACTEST2.


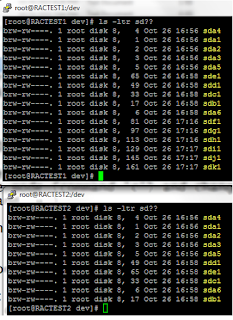
After formatting the disk, it will show on the server as below.
Step 3 Label the newly added disk on the node1
Here is the command to label the disk
oracleasm createdisk ORACLEDISK01_PRI /dev/sdf1
oracleasm createdisk ORACLEDISK01_SEC /dev/sdg1
oracleasm createdisk ORACLEDISK02_PRI /dev/sdh1
oracleasm createdisk ORACLEDISK02_SEC /dev/sdi1
oracleasm createdisk ORACLEDISK03_PRI /dev/sdj1
oracleasm createdisk ORACLEDISK03_SEC /dev/sdk1

Step 4 Query the newly added disk on the node1
oracleasm querydisk /dev/sdf1
oracleasm querydisk /dev/sdg1
oracleasm querydisk /dev/sdh1
oracleasm querydisk /dev/sdi1
oracleasm querydisk /dev/sdj1
oracleasm querydisk /dev/sdk1

Step 5 Scan the above disk on RACTEST2 node. This disk will not appear on node2 unless we scan the disk on the second node.
Here is the command to scan the disk.
oracleasm scandisks


Oh.. The disk group status shows DISMOUNTED on second node. Let us mount the database now.

Now both node looks good.
let us check the more info about the disk and diskgroup.
Query to check the diskspace :
select name Diskgroup,
round(total_mb/1024,2) "Total_TB",
round(free_mb/1024,2) "Free_GB",
round(((free_mb/total_mb)*100),2) "Available%"
from v$asm_diskgroup where name='ORACLEDATA';

Query to check the disk status info.
select dg.inst_id,
dg.name dg_name,
dg.state dg_state,
dg.type,
d.MOUNT_STATUS,
d.HEADER_STATUS H_status,
d.MODE_STATUS,
d.FAILGROUP ,
d.DISK_NUMBER dsk_no
FROM GV$ASM_DISK d,
Gv$asm_diskgroup dg
where dg.inst_id=d.inst_id
and dg.group_number(+)=d.group_number
and dg.name='ORACLEDATA'
/

Now we are done with creating the diskgroup. Now we can use the diskgroup for database!
Storage team will attach the raw disk on the node and handover to UNIX SA and SA will format, scan and label the disk, then handover to DBA team. DBA will create the diskgroup on the ASM instance. I am using Two node RAC and node names are RACTEST1 & RACTEST2.
High level steps for adding disk.
- Storage team add disk on the server
- Format the disk on ractest1 node
- Label the disk on ractest1 node
- Query and List the disk
- Scan the disk on ractest2 node
- Create the diskgroup on ASM instance on ractest1
- verify the disk on ASM instance for both node
We are adding 6 disks on the server and names are as follows.
- ORACLEDISK01_PRI
- ORACLEDISK01_SEC
- ORACLEDISK02_PRI
- ORACLEDISK02_SEC
- ORACLEDISK03_PRI
- ORACLEDISK03_SEC
Step 1 Storage team add raw disk on the server.
Storage team add the above 6 disk on the first node and make the disk shareable. Then attach the above said disk on the second node. Now we can see the above disks on both the nodes.
After adding the disk, the names will appear on server as below.

Step 2 Format the newly added disk on the node1
Login to RACTEST1 node and Partition the disk as below. Follow the below step for sdf, sdg, sdh,sdi,sdj & sdk.

After formatting the disk, it will show on the server as below.

Step 3 Label the newly added disk on the node1
Here is the command to label the disk
oracleasm createdisk ORACLEDISK01_PRI /dev/sdf1
oracleasm createdisk ORACLEDISK01_SEC /dev/sdg1
oracleasm createdisk ORACLEDISK02_PRI /dev/sdh1
oracleasm createdisk ORACLEDISK02_SEC /dev/sdi1
oracleasm createdisk ORACLEDISK03_PRI /dev/sdj1
oracleasm createdisk ORACLEDISK03_SEC /dev/sdk1
Now label the disk as below in RACTEST1 node

Step 4 Query the newly added disk on the node1
Now We can Query the disk on RACTEST1 as below. This is verification step to make sure the disk is created as we expected.
oracleasm querydisk /dev/sdf1
oracleasm querydisk /dev/sdg1
oracleasm querydisk /dev/sdh1
oracleasm querydisk /dev/sdi1
oracleasm querydisk /dev/sdj1
oracleasm querydisk /dev/sdk1
oracleasm listdisks

Step 5 Scan the above disk on RACTEST2 node. This disk will not appear on node2 unless we scan the disk on the second node.
Here is the command to scan the disk.
oracleasm scandisks

Step 6 Now the disk is ready to create in ASM instance. Here we are adding new disk group on ASM instance.
SQL> CREATE DISKGROUP oracledata NORMAL REDUNDANCY
FAILGROUP oracledisk01 DISK
'/dev/oracleasm/disks/ORACLEDISK01_PRI' NAME ORADISK01_PRI,
'/dev/oracleasm/disks/ORACLEDISK02_PRI' NAME ORADISK01_SEC
FAILGROUP oracledisk02 DISK
'/dev/oracleasm/disks/ORACLEDISK01_SEC' NAME ORADISK02_PRI,
'/dev/oracleasm/disks/ORACLEDISK02_SEC' NAME ORADISK02_SEC
ATTRIBUTE 'au_size'='4M',
'compatible.asm' = '11.2.0.2.0',
'compatible.rdbms' = '11.2.0.2.0',
'compatible.advm' = '11.2.0.2.0'; 2 3 4 5 6 7 8 9 10 11
CREATE DISKGROUP oracledata NORMAL REDUNDANCY
*
ERROR at line 1:
ORA-15018: diskgroup cannot be created
ORA-15031: disk specification '/dev/oracleasm/disks/ORACLEDISK02_SEC' matches no disks
ORA-15014: path '/dev/oracleasm/disks/ORACLEDISK02_SEC' is not in the discovery set
ORA-15031: disk specification '/dev/oracleasm/disks/ORACLEDISK01_SEC' matches no disks
ORA-15014: path '/dev/oracleasm/disks/ORACLEDISK01_SEC' is not in the discovery set
ORA-15031: disk specification '/dev/oracleasm/disks/ORACLEDISK02_PRI' matches no disks
ORA-15014: path '/dev/oracleasm/disks/ORACLEDISK02_PRI' is not in the discovery set
ORA-15031: disk specification '/dev/oracleasm/disks/ORACLEDISK01_PRI' matches no disks
ORA-15014: path '/dev/oracleasm/disks/ORACLEDISK01_PRI' is not in the discovery set
SQL>
The above step failed, because, it is configured using asmlib. We will have to use UDEV for the above disk group creation command to be successful.
SQL> CREATE DISKGROUP oracledata NORMAL REDUNDANCY
FAILGROUP oracledisk01 DISK
'ORCL:ORACLEDISK01_PRI' NAME ORADISK01_PRI,
'ORCL:ORACLEDISK02_PRI' NAME ORADISK01_SEC
FAILGROUP oracledisk02 DISK
'ORCL:ORACLEDISK01_SEC' NAME ORADISK02_PRI,
'ORCL:ORACLEDISK02_SEC' NAME ORADISK02_SEC
2 3 4 5 6 7 8 ATTRIBUTE 'au_size'='4M',
'compatible.asm' = '11.2.0.2.0',
'compatible.rdbms' = '11.2.0.2.0',
'compatible.advm' = '11.2.0.2.0'
/ 9 10 11 12
Diskgroup created.
SQL>
Step 7 Now the diskgroup is successfully created. Let us verify the disk on the ASM instance.
First let us check the disk status on both node.
First let us check the disk status on both node.

Oh.. The disk group status shows DISMOUNTED on second node. Let us mount the database now.

Now both node looks good.
let us check the more info about the disk and diskgroup.
Query to check the diskspace :
select name Diskgroup,
round(total_mb/1024,2) "Total_TB",
round(free_mb/1024,2) "Free_GB",
round(((free_mb/total_mb)*100),2) "Available%"
from v$asm_diskgroup where name='ORACLEDATA';

Query to check the disk status info.
select dg.inst_id,
dg.name dg_name,
dg.state dg_state,
dg.type,
d.MOUNT_STATUS,
d.HEADER_STATUS H_status,
d.MODE_STATUS,
d.FAILGROUP ,
d.DISK_NUMBER dsk_no
FROM GV$ASM_DISK d,
Gv$asm_diskgroup dg
where dg.inst_id=d.inst_id
and dg.group_number(+)=d.group_number
and dg.name='ORACLEDATA'
/

Now we are done with creating the diskgroup. Now we can use the diskgroup for database!


